在CentOS 7上安装Python3

This tutorial will guide you through installing Python 3 on a CentOS 7 system using the Software Collections (SCL) alongside the distribution default Python version 2.7. We will also show you how to create a Python virtual environment.

Python is one of the most popular programming languages in the world. With its simple and easy to learn syntax Python is a great choice for beginners and experienced developers. Python is a quite versatile programming language, you can use it to do almost anything you want, write small scripts, build games, develop websites, create machine learning algorithms, analyze data and more.

Many popular applications and websites including YouTube, DropBox, Reddit, Quora, Instagram, Pinterest have been developed using Python.

While Python 2 is well-supported and active, Python 3 is considered to be the present and future of the language.

Enable Software Collections (SCL)

Software Collections, also known as SCL is a community project that allows you to build, install, and use multiple versions of software on the same system, without affecting system default packages. By enabling Software Collections you will gain access to the newer versions of programming languages and services which are not available in the core repositories.


CentOS 7 ships with Python 2.7.5 which is a critical part of the CentOS base system. SCL will allow you to install newer versions of python 3.x alongside the default python v2.7.5 so that system tools such as yum will continue to work properly.

In order to enable SCL we need to install the CentOS SCL release file. It is part of the CentOS extras repository and can be installed by running the following command:


sudo yum install centos-release-scl

Copy

Installing Python 3 on CentOS 7

Now that we have access to the SCL repository we can install any Python 3.x version we need. Currently, the following Python 3 collections are available:

  • Python 3.3
  • Python 3.4
  • Python 3.5
  • Python 3.6

In this tutorial we will install Python 3.6 which is the latest version available at the time of writing. To do so type the following command on your CentOS 7 terminal:

sudo yum install rh-python36

Copy

Using Python 3

After the package rh-python36 is installed, check the Python version by typing:

python --version

Copy

Python 2.7.5

Copy

You will notice that Python 2.7 is the default Python version in your current shell.

To access Python 3.6 you need to launch a new shell instance using the Software Collection scl tool:


scl enable rh-python36 bash

Copy

What the command above does is calling the script /opt/rh/rh-python36/enable which changes the shell environment variables.

If you check the Python version again, you’ll notice that Python 3.6 is the default version in your current shell now.

python --version

Copy

Python 3.6.3

Copy

It is important to point out that Python 3.6 is set as the default Python version only in this shell session. If you exit the session or open a new session from another terminal Python 2.7 will be the default Python version.

Installing Development Tools

Development tools are required for building Python modules, you can install the necessary tools and libraries by typing:


sudo yum groupinstall 'Development Tools'

Copy

Creating a Virtual Environment

Python Virtual Environments allows you to install Python modules in an isolated location for a specific project, rather than being installed globally. This way you do not have to worry about affecting other Python projects.

The preferred way to create a new virtual environment in Python 3 is by executing the venv command.

Let’s say we want to create a new Python 3 project called my_new_project inside our user home directory and matching virtual environment.


First, create the project directory and switch to it:

mkdir ~/my_new_projectcd ~/my_new_project

Copy

Activate Python 3.6 using the scl tool:

scl enable rh-python36 bash

Copy

From inside the project root run the following command to create a virtual environment named my_project_venv:


python -m venv my_project_venv

Copy

To use the virtual environment first we need to activate it by typing:

source my_project_venv/bin/activate

Copy

After activating the environment, the shell prompt will be prefixed with the name of the environment:

(my_project_venv) user@host:~/my_new_project$

Copy

Starting with Python 3.4, when creating virtual environments pip, the package manager for Python is installed by default.

Conclusion

You should now have Python 3 programming environment setup on your CentOS 7 machine and you can start developing your Python 3 project.


You can also read about how to Install Odoo 11 on CentOS 7 and see an example of how to use Python 3 virtual environment to run Python software on a CentOS 7 server.
在 CentOS 7 / RHEL 7 安装 Gnome GUI

Linux admins spend most of their time on working in a terminal; there are some who like to work on GUI instead of a terminal. By default, CentOS 7 installed as the minimal server, and user intervention is required to change the installation type. This guide will help you to install GUI on CentOS 7 on the top of the minimal server installation.

Before installing GUI, make a Local Yum Repository to avoid downloading packages from the internet.

READ: How to Configure YUM repository on CentOS 7 / RHEL 7

Optional: Run the following command to list down the available package groups for CentOS 7.

# yum group list

Output:

Loaded plugins: fastestmirror
There is no installed groups file.
Maybe run: yum groups mark convert (see man yum)
Loading mirror speeds from cached hostfile
Available Environment Groups:
 Minimal Install
 Compute Node
 Infrastructure Server
 File and Print Server
 Basic Web Server
 Virtualization Host
 Server with GUI
 GNOME Desktop
 KDE Plasma Workspaces
 Development and Creative Workstation
Available Groups:
 Compatibility Libraries
 Console Internet Tools
 Development Tools
 Graphical Administration Tools
 Legacy UNIX Compatibility
 Scientific Support
 Security Tools
 Smart Card Support
 System Administration Tools
 System Management
Done


Step 1: Install Gnome GUI packages using the YUM command.


CentOS 7:

# yum groupinstall "GNOME Desktop" "Graphical Administration Tools"

RHEL 7:

# yum groupinstall "Server with GUI"

Step 2: Enable GUI on system startup. In CentOS 7 / RHEL 7,  systemd uses “targets” instead of runlevel. The /etc/inittabfile is no more used to change run levels. So, issue the following command to enable the GUI on system start.

# ln -sf /lib/systemd/system/runlevel5.target /etc/systemd/system/default.target

Step 3: Reboot the machine to start the server in the graphical mode.

# reboot

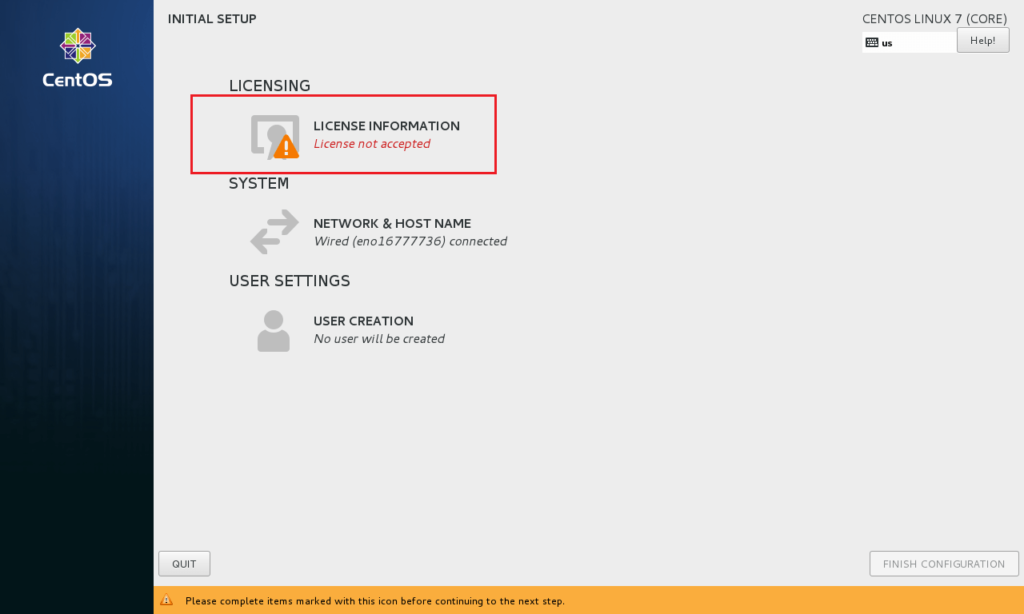
License Agreement:


Accept the license by clicking on the “LICENSE INFORMATION“.


Install Gnome GUI on CentOS 7 - Licensing Page
Install Gnome GUI on CentOS 7 – Licensing Page


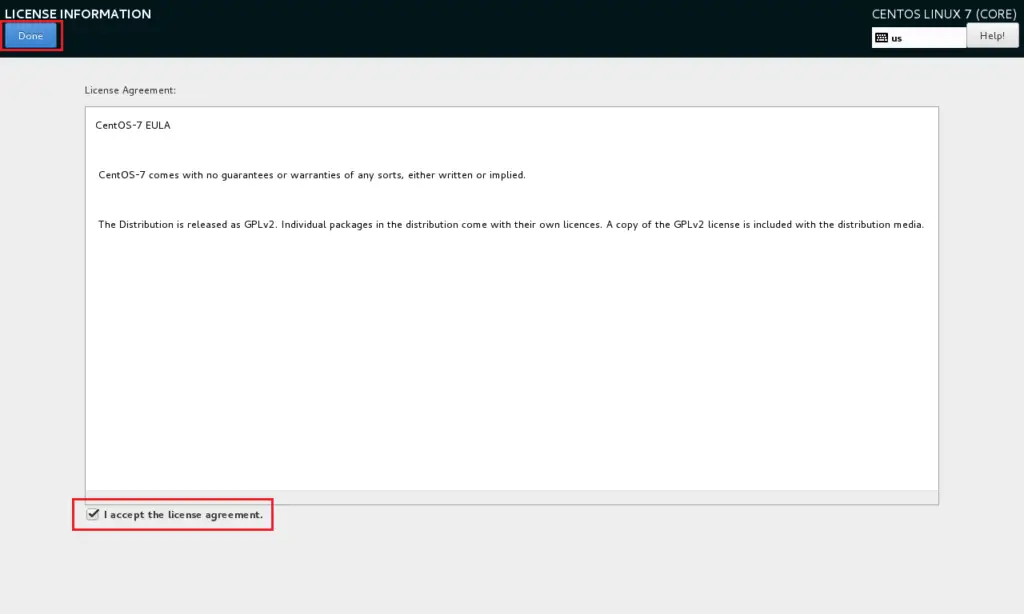
Tick mark the “I accept the license agreement” and click on “Done“.


Install Gnome GUI on CentOS 7 - License Agreement
Install Gnome GUI on CentOS 7 – License Agreement


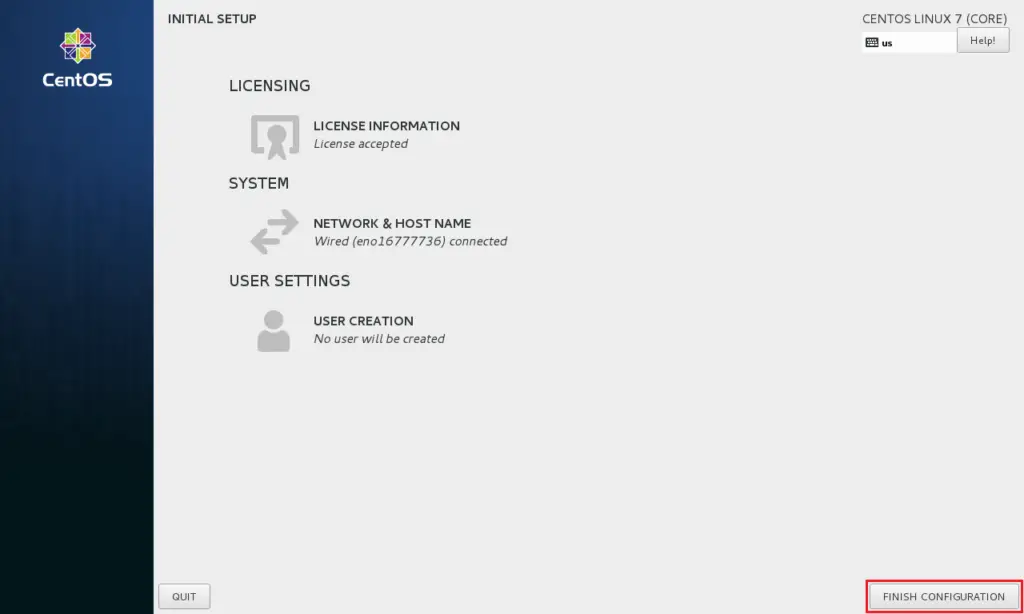
Click on “FINISH CONFIGURATION” to complete the setup.


Install Gnome GUI on CentOS 7 - License Accepted
Install Gnome GUI on CentOS 7 – License Accepted


You may need to do some post configuration tasks, like creating first user (local account), language, etc.


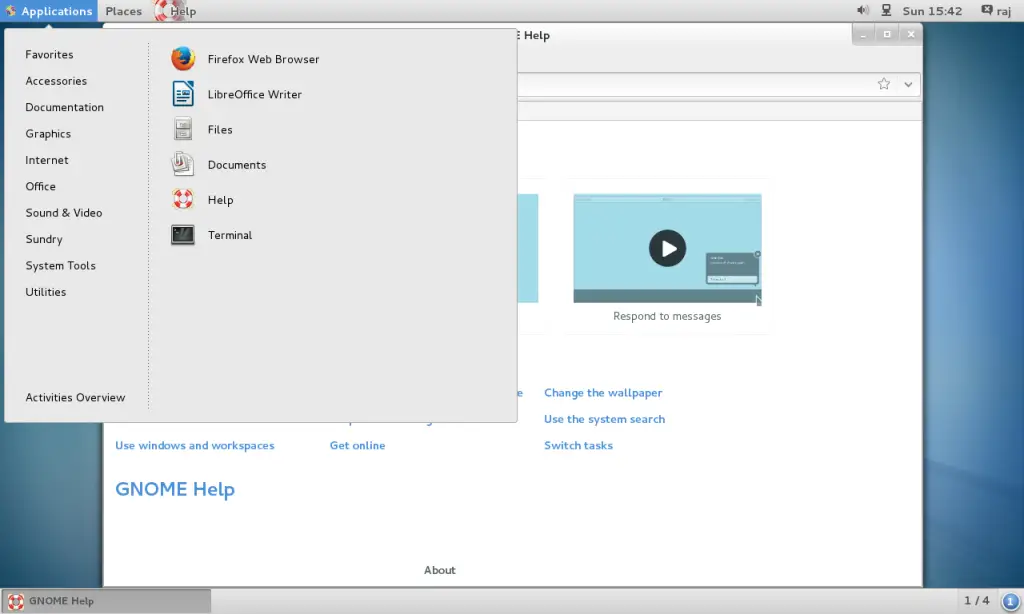
Then finally you will get the desktop.


Install Gnome GUI on CentOS 7 - GUI Desktop
Install Gnome GUI on CentOS 7 – GUI Desktop


That’s All. You have successfully installed GUI on CentOS 7 / RHEL 7.

在CENTOS7安装RDP,远程控制

xrdp is an Open Source Remote desktop Protocol server, which allows you to RDP to your Linux server from Windows machine; it is capable of accepting connections from rdesktop, freerdp, and remote desktop clients.

This post will help you to setup xrdp server on CentOS 7 / RHEL 7.

Prerequisites

1. First, install Gnome GUI on CentOS 7 / RHEL 7

2. xrdp is available in EPEL repository, so Install and configure EPEL repository.

rpm -Uvh https://dl.fedoraproject.org/pub/epel/epel-release-latest-7.noarch.rpm

Install xrdp on CentOS 7

Use YUM command to install xrdp package on CentOS 7 / RHEL 7.

yum -y install xrdp tigervnc-server

Output:


Loaded plugins: fastestmirror, langpacks
Loading mirror speeds from cached hostfile
 * base: centos.excellmedia.net
 * epel: del-mirrors.extreme-ix.org
 * extras: centos.excellmedia.net
 * updates: centos.excellmedia.net
Resolving Dependencies
--> Running transaction check
---> Package tigervnc-server.x86_64 0:1.8.0-2.el7_4 will be installed
---> Package xrdp.x86_64 1:0.9.5-1.el7 will be installed
--> Processing Dependency: xorgxrdp for package: 1:xrdp-0.9.5-1.el7.x86_64
--> Running transaction check
---> Package xorgxrdp.x86_64 0:0.2.5-3.el7 will be installed
--> Finished Dependency Resolution

Dependencies Resolved

=================================================================================================
 Package                    Arch              Version                   Repository          Size
=================================================================================================
Installing:
 tigervnc-server            x86_64            1.8.0-2.el7_4             updates            213 k
 xrdp                       x86_64            1:0.9.5-1.el7             epel               413 k
Installing for dependencies:
 xorgxrdp                   x86_64            0.2.5-3.el7               epel                61 k

Transaction Summary
=================================================================================================
Install  2 Packages (+1 Dependent package)

Total download size: 688 k
Installed size: 2.7 M
Downloading packages:
warning: /var/cache/yum/x86_64/7/epel/packages/xrdp-0.9.5-1.el7.x86_64.rpm: Header V3 RSA/SHA256 Signature, key ID 352c64e5: NOKEY
Public key for xrdp-0.9.5-1.el7.x86_64.rpm is not installed
(1/3): xrdp-0.9.5-1.el7.x86_64.rpm                                        | 413 kB  00:00:01
(2/3): tigervnc-server-1.8.0-2.el7_4.x86_64.rpm                           | 213 kB  00:00:01
(3/3): xorgxrdp-0.2.5-3.el7.x86_64.rpm                                    |  61 kB  00:00:01
-------------------------------------------------------------------------------------------------
Total                                                            409 kB/s | 688 kB  00:00:01
Retrieving key from file:///etc/pki/rpm-gpg/RPM-GPG-KEY-EPEL-7
Importing GPG key 0x352C64E5:
 Userid     : "Fedora EPEL (7) <epel@fedoraproject.org>"
 Fingerprint: 91e9 7d7c 4a5e 96f1 7f3e 888f 6a2f aea2 352c 64e5
 Package    : epel-release-7-11.noarch (installed)
 From       : /etc/pki/rpm-gpg/RPM-GPG-KEY-EPEL-7
Running transaction check
Running transaction test
Transaction test succeeded
Running transaction
Warning: RPMDB altered outside of yum.
  Installing : xorgxrdp-0.2.5-3.el7.x86_64                                                   1/3
  Installing : 1:xrdp-0.9.5-1.el7.x86_64                                                     2/3
  Installing : tigervnc-server-1.8.0-2.el7_4.x86_64                                          3/3
  Verifying  : xorgxrdp-0.2.5-3.el7.x86_64                                                   1/3
  Verifying  : tigervnc-server-1.8.0-2.el7_4.x86_64                                          2/3
  Verifying  : 1:xrdp-0.9.5-1.el7.x86_64                                                     3/3

Installed:
  tigervnc-server.x86_64 0:1.8.0-2.el7_4                xrdp.x86_64 1:0.9.5-1.el7

Dependency Installed:
  xorgxrdp.x86_64 0:0.2.5-3.el7

Complete!
</epel@fedoraproject.org>

Once xrdp is installed, start the xrdp service using the following command.

systemctl start xrdp

xrdp should now be listening on 3389. You can confirm this by using netstat command.

netstat -antup | grep xrdp

Output:

tcp        0      0 0.0.0.0:3389            0.0.0.0:*               LISTEN      1508/xrdp
tcp        0      0 127.0.0.1:3350          0.0.0.0:*               LISTEN      1507/xrdp-sesman

READ: netstat command not found on CentOS 7 / RHEL 7 – Quick Fix

By default, xrdp service won’t start automatically after a system reboot. Run the following command in the terminal to enable the service at system startup.


systemctl enable xrdp

Firewall

Configure the firewall to allow RDP connection from external machines. The following command will add the exception for RDP port (3389).

firewall-cmd --permanent --add-port=3389/tcp
firewall-cmd --reload

SELinux

Configure SELinux


chcon --type=bin_t /usr/sbin/xrdp
chcon --type=bin_t /usr/sbin/xrdp-sesman

Test xrdp Remote Connectivity

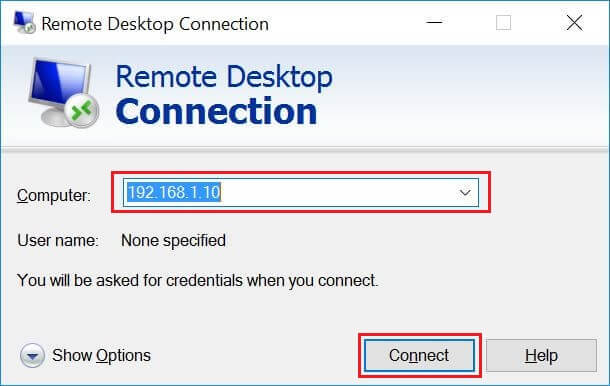
Now take RDP from any windows machine using Remote Desktop Connection. Enter the ip address of Linux server in the computer field and then click on connect.


Install xrdp on CentOS 7 - Enter IP Address in Remote Desktop Connecton Window
Install xrdp on CentOS 7 – Enter IP Address in Remote Desktop Connection Window


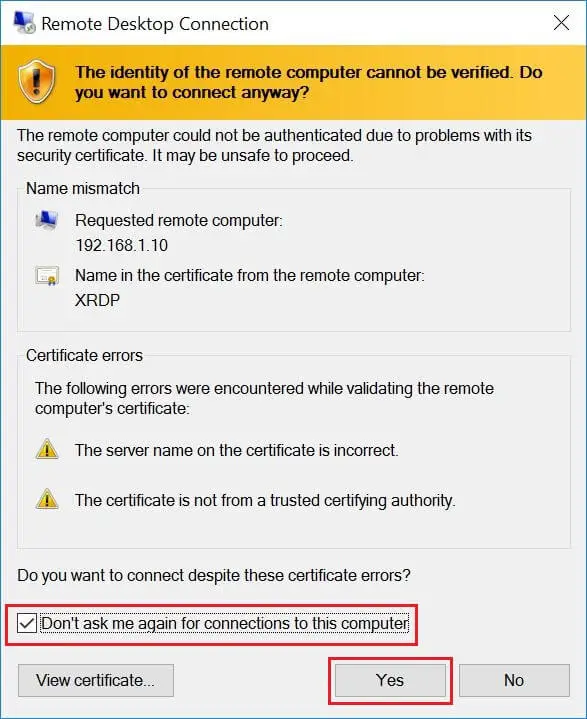
You may need to ignore the warning of RDP certificate name mismatch.


Install xrdp on CentOS 7 - Accept the Certificate
Install xrdp on CentOS 7 – Accept the Certificate


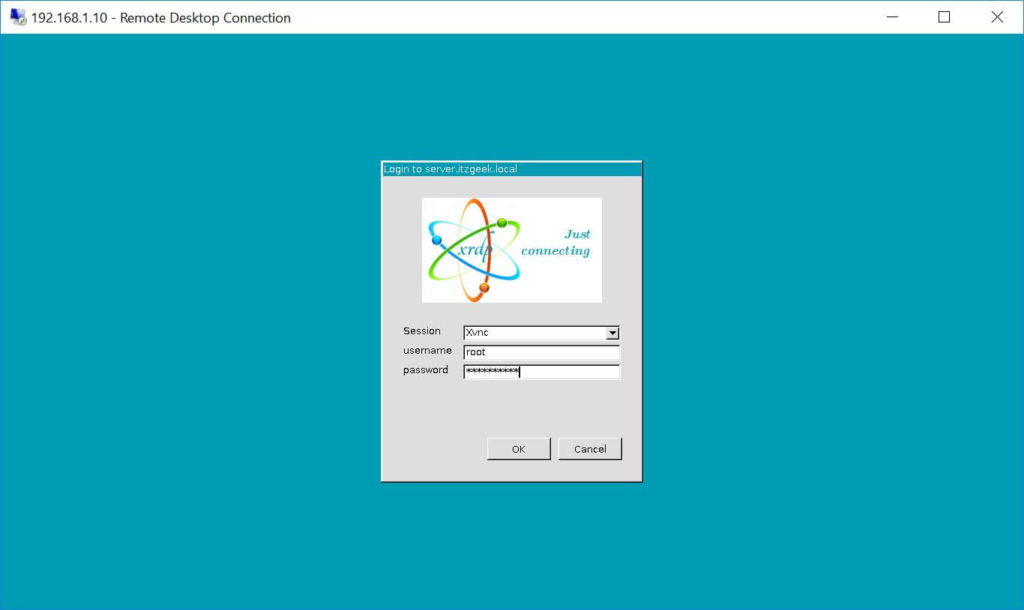
You would be asked to enter the username and password. You can either use root or any user that you have it on the system. Make sure you use module “Xvnc“.


Install xrdp on CentOS 7 - xrdp Login Page
Install xrdp on CentOS 7 – xrdp Login Page


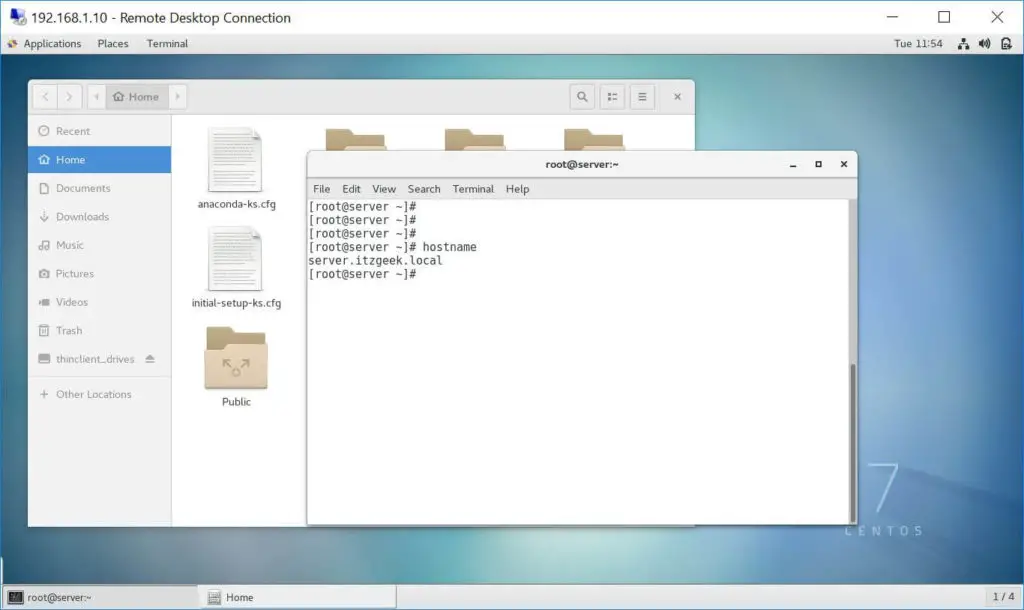
If you click ok, you will see the processing. In less than a half minute, you will get a desktop.


Install xrdp on CentOS 7 - xrdp CentOS Desktop
Install xrdp on CentOS 7 – xrdp CentOS Desktop


That’s All. You have successfully configured xRDP on CentOS 7 / RHEL 7.